The Garagemahal. Part Trois: A new room.
Posted: March 6, 2010 Filed under: Design, Garage Leave a commentFor four years after college, I worked from home. In fact a big chunk of this time was spent on the road, traveling the world with pro cycling teams, but working “in the office” actually meant working in my bedroom. And trust me, it was far from ideal.
The problem, in part, was that there was no divide between time at home and time at the office. The computer, fax machine (remeber those?), files and more were always inches away. Not a good thing for that elusive life/work balance.
Back then I promised myself that if I ever had the chance, I’d have a home office that was truly separate from the rest of the house. And our garage project gave us this chance.
In reality we designed the 375 square foot space above the garage to be supremely flexible. It can be (and has functioned at different times) as an office, a craft room, a yoga studio, a play room, a bike shop and more. Call it an “away space,” if you’d like.
The Loft, as we call it, is one of our favorite spaces. It’s beautiful, and with the abundance of light and views of trees and gardens, feels like a very adult tree house. The clerestory windows, bamboo floors, maple trim and moulding, and ample-sized deck all add to the experience.
And while we have a heat pump to heat and cool the space, more often than not it’s off. Until you’re in a space like our loft, you don’t realize how noisy any house’s systems (furnace, water, etc.) are.
K. often practices yoga up here and loves the quality of light, the privacy and of course the beautiful floors. Evidently when one practices yoga a lot of time is spent looking at the ground/mat.
Anyway, it’s a space we’re proud of. Like many other projects in the 1527 House, we took our time, learned new skills, and picked and chose materials carefully. The bookcase guardrail, that gives something interesting to look at as you enter the space, is something I’m particularly happy with. And the maple trim is mellowing to a beautiful color. Most people though comment on the amber bamboo floors. The vertical grain works well in the space, and the variation in color has an added benefit of masking dirt!
Here are a handful of happy snaps. Really, I need to get back up there to take some better pictures. These don’t come close to doing the space justice.

Not sure why that old radio was there, but here's a view onto the deck. Up close that desk is very cool. It was my great-grandfather's drafting desk.

Before the garden started to mature. Funny to look at how small these plants were. Fun to look back on. Anyway, the deck is a super-nice place to hang out on and offers a nice view of the garden and patio.

Kind of embarassed to even include this, but it at least shows the view entering the loft. Really, it looks much better today.
Early design inspiration
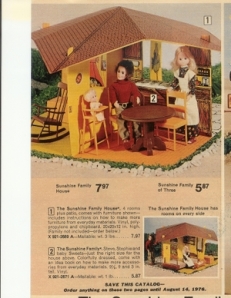
Posted: February 23, 2010 Filed under: Design 2 CommentsWhen I was in elementary school, I spent endless hours as design consultant to a couple named Steve and Stephanie Sunshine. An ecologically minded couple on a tight budget – they were also new parents – the Sunshines urged me to reuse and recycle whenever possible. Egg cartons, plastic strawberry containers and toothpaste caps all found repurposed places in the Sunshines’ modest four-room home (as a light fixture, crib for baby Sweets and trash bins, respectively). I think they really appreciated the uniqueness of the custom items I created for them.
Because I didn’t have any sewing skills to speak of, Kleenex became the all-purpose fabric of choice for blankets, pillows and clothing, reinforced with a good deal of tape. Cardboard boxes, plastic lids, wrapping paper, beads and yarn all held a galaxy of possibilities. It was not playing with these dolls, making them talk and interact, that was so much fun, but the process of deciding what they needed for comfortable lives and then figuring out how to make it from whatever I could scrounge up.
Designing and making things for the Sunshines’ home sparked an early love of fixing things up that was not reignited until A. and I moved into the 1527 house. With a limited budget but plenty of weekend and after-work hours, we figured “Why not try?” Joint compound, a wonderbar, tin tiles and 2x4s became the new materials holding dreamy possibilities. An investment in a basic sewing machine and scrutiny of its accompanying guidebook helped me step up to creating curtains and covers out of real fabric.
Comparing our most recent project to our earlier ones, I am amazed by how much we’ve learned and how many new skills (and tools) we have collected. What I have always loved most about every one of our projects is that we did them ourselves and we did them together (and that we are still together!). For many projects, professionals are definitely needed. For many other things, a fabulous purchase cannot be beat.
But for plenty of others, a little sawing/stitching/sanding/spackling turns out something that is just right.
A new master
Posted: January 31, 2010 Filed under: Bathroom, Bedroom, Design, Master Bedroom, Uncategorized Leave a commentIt would have been so much easier to just slap up a new coat of paint. Unfortunately–or fortunately depending on how you look at things–we consistently get more ambitious, not less.
From the time we moved in, K & I had talked about making changes to the master bedroom. In terms of what we had to work with, for an old house, we lucked out. The master is big, a rarity in turn-of-the-century house: Walk-in closets, a large main room, an interesting wall of windows. But it also has a somewhat awkward adjoining area that was half-tucked under a dormer, half under a sloping roofline.
That awkward space though is what we pictured as a place for a master bathroom. When we showed it to friends and family, walking them through our vision, we were mostly met with raised eyebrows and skeptically nodding heads. But whatever. It wasn’t the first time people thought we had jumped the shark when it came to our renovation plans. We assured everyone that it would be cool-they just needed to understand it would be a little funky.
In fact it would have been way too funky. Strange funky, not cool funky. So at the 11th hour (meaning after I had already started demolition) we called our friend and uber-architect Matt Melcher. K had the idea of moving two walls, but we weren’t sure how it would affect the space. As usual, Matt came up with a stack of great options, and we ended up blending two based on what we thought would work. The thing is, a good architect looks at space differently. Every time we’ve worked with Matt he’s brought us ideas that we never would have thought of. This is a good thing.
I won’t completely bore you with a “woe is us” tale of living in a house during a major demolition. So here’s the short summary comparing what we thought would happen vs. what actually happened:
What we thought:
- Add in a bathroom, easily tapping into the plumbing stack in the wall between our room and our existing bathroom. Simple!
- Remove the plaster in the future bathroom only, leaving the existing plaster in the main room and closets. Replace it with water-resistant greenboard drywall
- Refinish the vertical-grain fir wood floors throughout the room
- Update our closets with new hardware
- And of course, make minor plaster repairs and repaint the rooms
- Complete the project in eight weeks, for a super-low price
What we actually did
- Removed all the plaster and lath in the entire room–every wall, ceiling, in closets, etc. And because we were living in the house while this was happening, I had the privilege of carrying out a roomful of plaster in paper grocery sacks.
- Reinsulated all exterior walls
- Moved two walls, adding in new five-panel pocket doors
- Completely rewired the upstairs, running a new “homerun” to our panel
- Had giant holes in our dining room ceiling and wall for months. These were needed to run brand new plumbing and electrical lines up from the basement
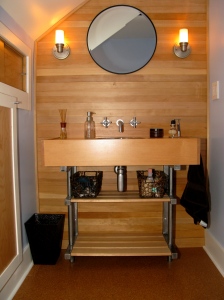
- Removed the VG fir flooring in the bathroom, replacing it with cork. We then milled down the old flooring and paneled a bathroom wall with it
- Milled down old trim, using it to build new cabinetry (very old, very beautiful wood)
- Built two completely new closets, including custom rods, maple cabinetry and lighting
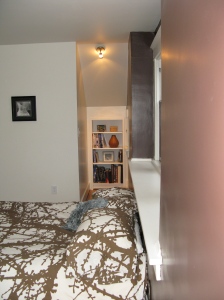
- Opened up the headboard wall to create two light wells
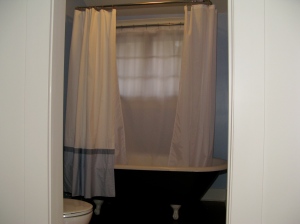
- Refinished a clawfoot tub found on craigslist that had been sitting in the carriage house of an old Kirtland Cutter mansion for the past 50 years
- Spent every weekend, all weekend for eight months working on the project. Spent a boatload of money.
- Hired Sean Smith, a.k.a. Smitty, to custom build us a set of steel brackets to support the fir sink box
Below we’ve attached a series of photos. I think these better-describe our results than the writing above. Overall, we couldn’t be happier about how things turned out. It’s a very unique space, but also in keeping with the period of the house. The interplay of light and shadow is wonderful, and having new cabinetry and high-quality fixtures in the bathroom is fantastic.
Also, despite moving the walls in, it’s impressive that the room feels substantially bigger. I think this has to do with the headboard wall extending so far beyond the closet and bathroom walls. Plus, it’s a space that’s totally appropriate for a king-size bed.
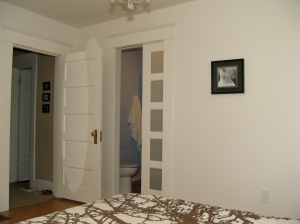
From here you can also see the new bathroom. The doors are 5-panels, with frosted glass on a pocket door track.

Yes, K likes her shoe rack. To answer the question I know you're wondering about, it's made from maple and hemlock. Also, it holds 30 pair of shoes.

We found two of these giant metal jacks at a thrift store years ago. It seemed like a more interesting doorstop than what we found at Home Depot.

For a good part of the year, it pretty much felt like we were living in a crack house. Minus the crack.
Sqaures, symmetry and the brain splinter
Posted: January 30, 2010 Filed under: Design, Dining Room, Living Room Leave a commentNo, none of us really have a splinter in the brain. But stick with me on this one.
One thing that surprises people when they first visit our house is the way it feels. Not the way it’s decorated necessarily, or the flow of the house (although that’s great too), but…something.
After living here as long as we have, I’m convinced that this “something” has a lot to do with how the house is designed. Virtually every room is based on a square. When you walk in, the living room is rectangular–in fact two perfect squares. The dining room, taking out the bay window and built-in hutch, a 13′ x 13′ square. The large windows? Sqaures. The dental moulding on the fireplace surround? More squares. The fabric on our roman shades? Subtle squares. And the result is exceptionally pleasing. It creates a feel that’s comfortable, and that works in a way that’s subtle, but surprising.
So this leads me to my brain splinter. I have this theory that certain things lodge in your brain in ways you’re not immediately aware of. You know something is different, or pleasing, or interesting, but you’re not sure what or why. This concept isn’t limited to how you might feel in a house. I get it in certain cars, looking at artwork, using certain products, and more. It’s a fun idea to chew on, anyway.
Symmetry can have this effect too, and we really played this up in our garage–a freestanding one-car, two-story structure with a very cool room upstairs–that will most certainly be the subject of at least a couple of posts. We built it from the ground up, including doing the majority of the work ourselves. Anyway, its design is hypersymmetrical, and one of the most pleasing spaces I’ve been in.
These ideas are difficult to capture in pictures, but here are a few details that might be interesting.


